In addition to the manual data entry in the Climate Hub, activities can also be uploaded via CSV file. CSV upload is particularly useful when many activities need to be entered, updated or transferred to other (sub-)stages at the same time.
The upload is done in five steps:
1. Download the CSV template
2. Fill in the CSV template
3. Upload CSV file
4. Correct errors
5. Upload the corrected CSV file again
1. Download the CSV template
Download our CSV template, which already contains all existing activities for the selected (sub-)stage.
Here's how to proceed
1. Open the Specific Data Upload in the desired (sub-)stage.
2. In the pop-up, click on CSV Download.
3. The CSV template will be downloaded automatically. 
Important to know
Activities already created in Climate Hub
-
Activities already existing in Climate Hub are included in the CSV file.
-
Entries changed in the CSV file are automatically updated during upload.
Deleting activities
-
If rows are deleted from the CSV file, the corresponding activities are also deleted from Climate Hub during upload.
-
Therefore, only delete entries that you no longer need.
2. Fill in the CSV template
Once you have downloaded the file, you can start entering the data. The template contains 9 columns. Only the Name* column is mandatory and must be filled in for each activity.
To avoid errors during upload, please use the following overview as a guide when filling out the CSV file.
Column overview
Columns for activity data
Name* (mandatory field, max. 100 characters)
Enter the name of the activity (e.g. a material, a process, a product, a service, or another relevant emission driver). Please note that the name must be unique and must not occur more than once.
Identification number (optional, max. 30 characters)
If the material, process, product, service or activity has a unique identification number internally or externally, it can be entered here.
Value (optional, only numeric values)
Enter the consumption or quantity of the activity here. If no value is entered, the system automatically sets the value to 0 during upload. This is indicated by a grey icon showing a document and an exclamation mark. The correct value can be added manually via the system at any time later. ![]()
Unit (optional, predefined answer options)
Enter the corresponding unit for your activity here. Only use one of the following options from ecoinvent:
| Unit category | Answer options |
| Energy | Wh, KWh, MWh, GWh, MJ, GJ, TJ |
| Weight | g, kg, t, short-ton, lb |
| Freight transport | tkm, tmi, short-ton-mi |
| Passenger transport | pkm, pmi |
| Distance | m, km, ft, mi, nmi |
| Volume | ml, Liter, m3, gal, bbl, scf |
| Area | m2, km2, ft2, ha |
| Miscellaneous | Nights, Quantity |
Note:
If the unit and emission factor unit are empty, both are automatically preset with m3. In this case, a grey icon depicting a document and an exclamation mark appears at the beginning of the activity line. The correct unit can be added manually later via the system.Precision (optional, predefined answer options)
Enter the quality of the value entered here. Only use one of the following options:
-
Document / Measurement
-
Extrapolation
-
Cost-based
- Estimate
Please indicate here how far you are in the data collection process. You can choose one of the following answers:
- Not Relevant
- Relevant
- Review
- Done
Comment (optional, max. 1500 characters)
You can add additional information here.
Columns for LCA datasets
f you only want to upload activities without searching for an LCA dataset, please leave the following columns empty. During upload, all characterization factors will automatically be set to zero. This is also indicated by a grey icon depicting a document and an exclamation mark at the beginning of the activity line. The correct characterization factors can be added later in the system at any time.
System boundary (leave empty)
ISO country code (leave empty)
If you want to use the Smart LCA dataset module directly — i.e. automatically assign a suitable LCA dataset to an activity — you can fill in the following fields to improve matching accuracy.
System boundary (optional, predefined answer options):
Enter the system boundary for the activity here. It defines which part of the products life cycle the LCA dataset covers. Only use one of the following options:
- cradle_to_consumer: Covers the full life cycle from raw material extraction to the consumer, including production and transport.
- use_phase, upstream, transmission_and_distribution: Typically used for energy or utility processes where generation, distribution, and use are considered separately.
- source_specific: No standardized system boundary; please refer to the detailed description of the LCA dataset.
ISO country code (optional, max. 30 characters)
The ISO country code refers to the country from which the material is supplied or the activity is sourced. Even if the column is not validated, it is recommended to enter a two-digit ISO country code based on the ISO 3166-1 standard. This ensures consistent documentation and enables a higher hit rate for automated emission factor suggestions via the Smart LCA dataset module.
3. Upload CSV file
The completed CSV file is checked for errors and then transferred to the Climate Hub.
Here's how to proceed
1. Reopen the Specific Data Upload.
2. Select the appropriate character set.
3. Upload the file using Browse or drag and drop.
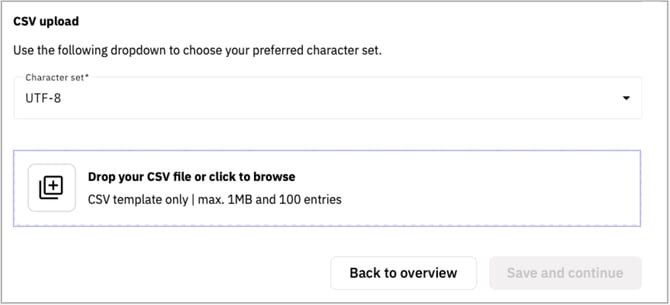
Important for Excel users
Ensure that the file is saved as CSV UTF-8:
-
Click on File > Save As.
-
Select CSV UTF-8 as the file format.

After the upload
-
The file is displayed in the pop-up window.
-
Click Save and Continue to transfer the data to Climate Hub.

- If an error occurred during the upload, a red error message will appear. The Save and Continue button will remain disabled until the errors have been corrected.

Automatic data synchronisation
After uploading, the data is automatically transferred to the Climate Hub:
- Existing activities are updated if data has changed.
- Newly added activities are transferred to the Climate Hub.
- Activities deleted from the CSV file are deleted in the Climate Hub.
Caution: Overwriting and assigning activities
When uploading CSV files, the most recently uploaded CSV file is always considered valid. Ensure that it contains all relevant activities.
Assignment is based solely on the name of the activity. If the name is changed, the activity can no longer be assigned.
Important note on data usage
Not all uploaded information is immediately visible in the Climate Hub. However, the data is stored in the background and will be automatically available as soon as the corresponding functions are activated.
Tip: Fill in all available fields now – this will save you having to manually update them later.
Upload CSV file to other (sub-)stages
The CSV file can also be uploaded to a different (sub-)stages than the one from which it was originally downloaded. This allows you to flexibly transfer activities that have already been created without having to re-enter them manually.
4. Correct errors
The system checks the CSV file for format and content errors.
Common types of errors
-
Incorrect CSV template
-
CSV template saved in a different format (e.g. Excel)
-
Additional or renamed columns
-
Content validation errors
Please correct the errors in the CSV file.
5. Upload the corrected CSV file again
After making the corrections, upload the CSV file again. The system will check the file again and accept it as soon as there are no more errors.
Here's how to proceed
1. Reopen the Specific Data Upload.
2. Upload the corrected CSV file.
3. Click Save and Continue once no more error messages are displayed.