![VERSO_Logo-1.png]](https://helpdesk.verso.de/hs-fs/hubfs/Globale%20Design-Elemente/VERSO_Logo-1.png?height=50&name=VERSO_Logo-1.png)
How do I provide EUDR data for my customers?
TABLE OF CONTENT
Overview
Your customer has ordered products from you that fall under the EUDR and is placing them on the EU market. For their due diligence statement, they need information from you on the land plots where the commodities were produced (geodata) and when they were harvested, as well as information on the risk of circumvention and the complexity of the supply chain for the batches delivered.
To provide this, follow these four steps:
- Check the order: See which products your customer has ordered.
- Create a batch: Create a batch for these products if no suitable one exists yet.
- Assign land plots: Add the land plots the goods come from to the batch.
- Assign the batch: Assign the batch to the order and add the net weight and country of import.
A batch is a specific quantity of goods that you deliver to your customer over a specific period, together with the land plots those goods come from. You can use one batch for several orders, including orders from different customers.
You can find general information on the EUDR here.
Step 1: Check the order
- In the main menu, go to “EUDR” >> “Received Orders”.
- Here you can see all products your customers have ordered from you. Products that do not yet have a batch assigned can be identified in the “Batches” column.
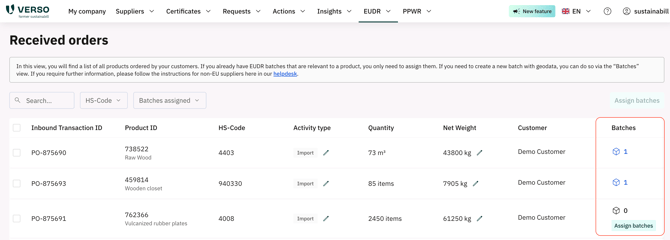
Suitable batch available? Continue with Step 4.
No suitable batch? Continue with Step 2.
Step 2: Create a batch
- In the main menu, go to “EUDR” >> “Batches”.
- Click “Add batch”.


3. Fill in the form:
- Batch ID: a unique identifier, e.g. your internal batch number.
- HS-Code: must match the HS code of the ordered product; otherwise, you will not be able to assign the batch to the order later.
- Name: a meaningful trade name, e.g. “Coffee summer harvest north Tarrazú”.
- Valid until: the date until which you will deliver goods from this batch. Orders with a delivery date up to this date can be answered with the same batch.
- Risk analysis: Answer the questions on the “risk of circumvention” and the “complexity of the supply chain”. Your customer needs this information for their risk assessment.

To create several batches at once, use “Upload batches” with the Excel template.

Note: A batch may only contain goods from land plots that have already been harvested. For goods from a later harvest, please create a new batch.
Step 3: Assign land plots
Each batch needs at least one land plot. In the batch list, click “Assign” next to the relevant batch.

You have three options:
Option A: Upload geodata as a file
- Upload your geodata in GeoJSON format.
- Enter the harvest start and end date. These dates apply to all land plots in the file.
- For wood: Enter the common name and the scientific name of the tree species.
- Click “Submit”.
If a land plot has already been uploaded previously, it will be updated automatically based on its name and coordinates.

Option B: Draw the land plot on the map or enter coordinates
- Click “Open map drawing tool”.
- Draw a polygon: Click the square icon (1) and mark the corners of the land plot on the map. Press Enter to finish drawing.
- Set a point: Click the pin (2) and select the point on the map.
- Or enter coordinates: Enter the coordinates (3) and click “Update coordinates”.
- Add the properties (4) and click “Save” (5).
- Enter the harvest start and end date and click “Submit”.
Please draw the land plot as accurately as possible and zoom into the map to do so. Drawing a region or an entire country is not permitted.

Option C: Select previously uploaded land plots
If you have already uploaded the land plots, you can select them directly:
- Click “Assign land plots”.
- Select the land plots and enter the harvest date and, for wood, the common and scientific name.
- Click “Submit”.

To find out when a point is sufficient and when a polygon is required, see the article Capturing and storing geodata.
Additional: Managing land plots and uploading documents
You can find all uploaded land plots under “EUDR” >> “Land plots”. There you can edit land plots or add new ones.

Producer documents: In the “Producer documents” column, you can upload evidence for each land plot. Click “Add document”, select the document type and upload the file. The available types are: Logging permit, Proof of land title, Certification of producer company, and Other producer document.
These documents help your customer demonstrate that the commodities were produced in accordance with the laws of the country of production and that the land was lawfully used. Depending on what you have available, suitable documents include, for example, official permits, land titles or comparable evidence, certifications, contracts, management plans or audit reports.
Step 4: Assign the batch to the order
- Go back to “EUDR” >> “Received Orders”.
- Assign the batch:
- For one product: Click the button in the “Batches” column (2).
- For several products: Select the products and click “Assign batches” (1) in the top right corner.
- Select the appropriate batch and click “Assign batches”. Only batches with the same HS code as the ordered product are displayed.


-
- Net weight: Click the pencil icon in the “Net Weight” column and enter the net weight of the order in kilograms.
- Country of import: In the “Activity” column, enter the EU country through which the goods are imported into the EU.
The order is now answered. Your customer will see your information in their risk analysis.